Hi friends! If you want to Change the Displayed Name of the processor, then this post for you. This short tutorial will teach you how to Change Processor Name in System Properties
For example, before my computer’s processor’s name was displayed as Core 2 Duo T9600 @ 2.80 GHz. After the simple hack, I changed the name to Intel Pentium i7 GHz Haswell APU with Radeon(TM)HD graphics. The processor’s new hacked name doesn’t have to be a name of a real processor, you can name it something silly!
Change Processor Name in System Properties

Step 1: Open up the Registry Editor (RegEdit).
First, Click Start, and search RegEdit (Windows 7/Vista). Open up regedit when the search has found it.
For Windows 8 or later version: Open Run dialog box (Press windows key + R to open the run dialog box) and type “regedit” and press ok.
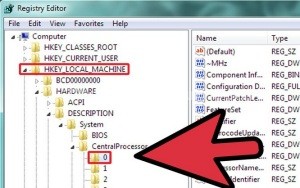
Step 2: On the left-hand column in Registry Editor, open HKEY_LOCAL_MACHINE, under it, >> open up: Hardware->DESCRIPTION->System->Central Processor->0
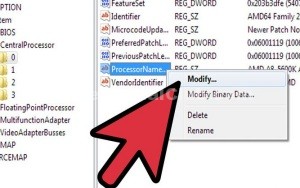
Step 3: Now you can see a few lines of text on your right side in Registry Editor. Double-click the one that is named “ProcessorNameString”. Click on modify
Step 4: A small box will pop-up, and you can change the processor’s name to anything you like here I type Intel Pentium i7 GHz Haswell APU with Radeon(TM) HD graphics. After your done, press enter and close Registry Editor.
Now You will see what we have changed under Windows.
Step 5: Open Start, and Right-Click Computer, then click Properties in the Context Menu.
Step 6: You can see your processor name changed to whatever you changed it to.
Final Words:
Hope you understood this article about Change Processor Name in System Properties. If you have any quarries, feel free to leave your comments below in the comments section.


