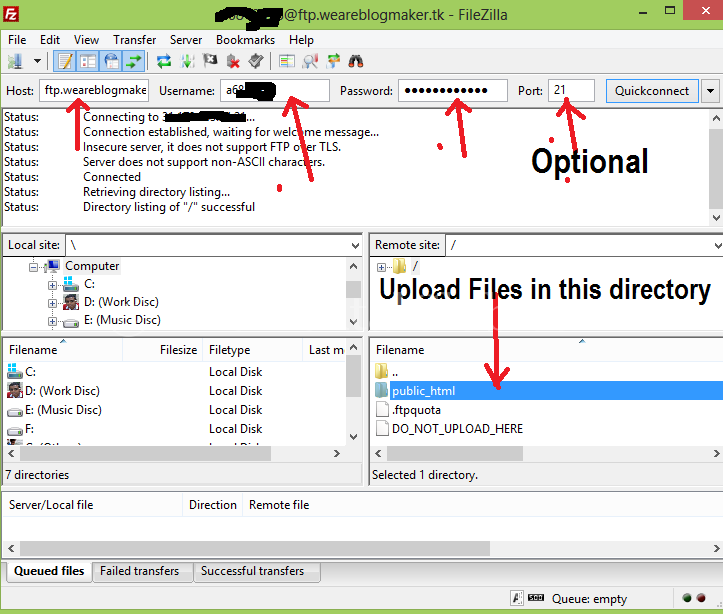
Hello friends, if you want to upload your website files by using FTP Client then this post for you. I will show you how to upload website files by using FileZilla. You know FileZilla is a popular and free FTP client. It is also very fast and very easy to use.
In my previous tutorial, I told that how to upload website files by using web-based FTP (File Transfer Protocol) from any browser. But it is a very natural upload process. This process has some problems.
If you want to upload many files at a time then don’t use (web-based upload) this process, please use an FTP client for uploading. Because it will take too less time for uploading. You will able to access any folder or directory more quickly.
It (FileZilla) will show you uploading speed, file transfer speed, number of queued files, number of failed transfer files and number success transfers files. You can retransfer files which are failed to transfer (if it shows any message then you have to use rewrite option at the time of retransfer).
Requirements: FTP Clients, FTP hostname, FTP username, FTP password and PORT number (The port number of the maximum host is: 21).
Some popular FTP Clients are: SmartFTP, FileZilla (Recommended by may web hosting providers).
Where do you upload your files?
You have to upload your all website files in “public_html” directory/folder.
Now follow the steps to upload your website files by using FileZilla.
Step 1: At first download FileZilla from here and install it in your PC.
Step 2: Collect FTP details of your domain and hosting.
Step 3: Open FileZilla and Login (Connect using your FTP details).
Step 4: Open public_html folder and drag and drop your website into the public_html folder. Wait few seconds or minutes to complete the upload.
Problem? Watch the video tutorial.
Thank you for reading…


