


Introduction
The official Arduino provides a rich driver library to facilitate the operation of peripherals. Here introduces the use of the nixie tube library. By reading the potentiometer input, the nixie tube library is used to drive the tube to display the corresponding digit number.
The SevSeg library is a nixie tube driver library. It is commonly used to drive four-digit tubes. The library can be searched and installed from the Arduino IDE management library, or it can be obtained from Github.
Install SevSeg Library
1) Running Arduino IDE (Sketch_sep05a | Arduino 1.8.5)
2) Look up SevSeg: Choosing the Sevseg by Dean Reading
Experimental Materials
Uno R3 development board
Supporting USB cable
Breadboard and supporting wires
Common-cathode nixie tube
1x 220Ω current-limiting resistor
1x potentiometer
Experimental Steps
1.Build circuit according to schematic diagram
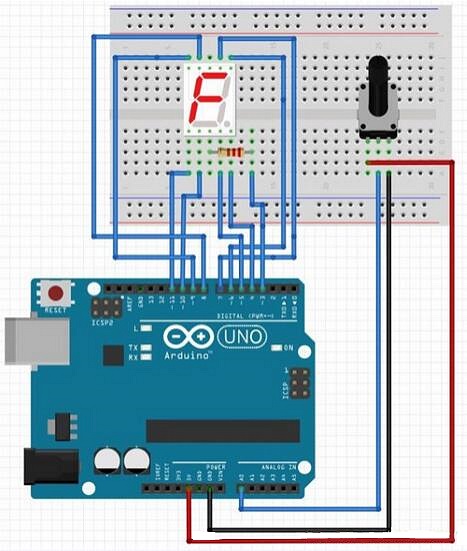
The letter pins A, B, C, D, E, F, G, DP of the nixie tube are connected to the digital pins 7, 6, 5, 10, 11, 8, 9, 4 of the development board respectively. The common end of the nixie tube is connected to the current-limiting resistor, and the other end of the resistor is connected to the pin 3. The middle pin of the potentiometer is connected to A0, and other two ends are respectively connected to 5V and GND.
The experimental schematic diagram is as follows:
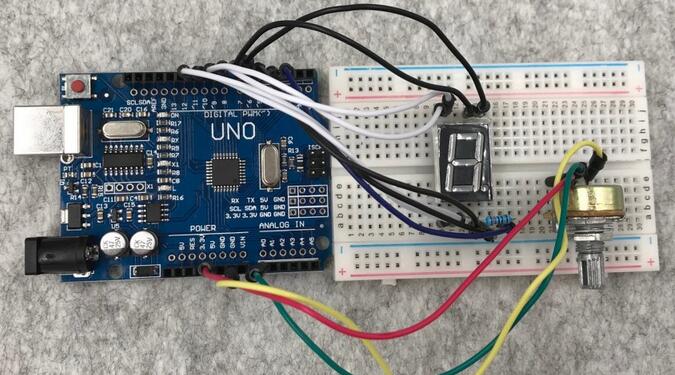
The physical connection diagram is as follows:
2. Create a new sketch, copy the following code to replace the automatically generated code and save it.
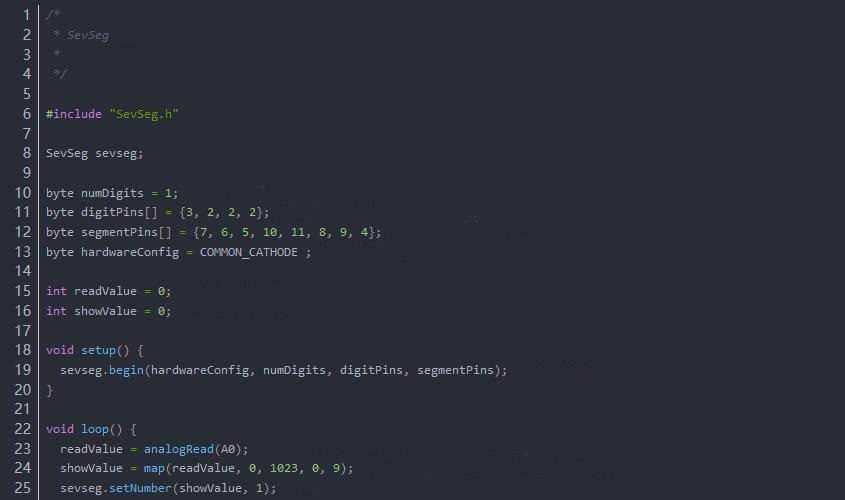
3. Connect the development board, set the corresponding port number and development board type, and download the program. The following is the part program code:
byte segmentPins[] = {7, 6, 5, 10, 11, 8, 9, 4} ; // Corresponding to the letter pins A, B, C, D, E, F, G, DP
byte hardwareConfig = COMMON_CATHODE ;
int readValue = 0; // Save read value
int showValue = 0; // Display value
void setup() {
sevseg.begin(hardwareConfig, numDigits, digitPins, segmentPins) ; // Initialize nixie tube
}
void loop() {
readValue = analogRead(A0) ; // Read the value of analog port A0 (0-5V corresponds to the value of 0-1023)
showValue = map(readValue, 0, 1023, 0, 9) ; // Map the dat between 0-1023 to the data between 0-9
sevseg.setNumber(showValue, 1) ; // Nixie tube display
sevseg.refreshDispaly() ; // Must run and refresh the nixie tube repeatedly for display
}
Experimental Result
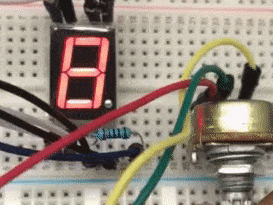
As the potentiometer rotates, the nixie tube displays the numbers 0 to 9.
Introduction to Functions
1.sevseg.begin(hardwareConfig, numDigits, digitPins, segmentPins)
hardwareConfig: 1) COMMON_CATHODE; 2) COMMON_ANODE
numDigits: The digital number of nixie tubes, we are using one-digit nixie tube, so its value is set to 1.
digitPins: The form of an array, it is used to store the pin numbers connected to the common pole of the nixie tube. This database is mostly used to drive four-digit tubes. In this experiment, the number of the array is 3 (corresponding to the actual circuit connection), and the other numbers can be filled in unused pins.
segmentPins: The form of an array, it is used to store the pin number from A to DP.
2. SevSeg.setNumber(numToShow, decPlaces)
numToShow: The data to be displayed can be integer or floating point numbers.
decPlaces: The position of the decimal point display is counted from the least significant digit. If omitted or set to -1, the decimal point is not displayed.
3. SevSeg.refreshDisplay()
This function needs to be executed and refreshed repeatedly to make the nixie tube display. If there are delays in the program, it will affect the number display.
Experimental Analysis
For the sevseg driver library used in the program, it should be initialized according to the actual circuit connection. Read the data of the analog input pin A0 in the loop() function, remap the data into numbers 0 to 9 through the map() function, then use the sevseg.setNumber() function to set the data, finally use the display refresh function refresh the number display.
source: https://github.com/DeanIsMe/SevSeg
Recommended Reading
Arduino Software (IDE)
How to Drive Nixie Tubes
Introduction to Light-emitting Diode Basic
Common Potentiometer Types Selection


 Simply")
 – Bangla Typing Software Download")
")


